Get Rentiqo running
A complete walkthrough — from uploading the files to taking your first booking. Most installations finish in under fifteen minutes.
Introduction
Rentiqo is a self-hosted rental business management system. It handles the whole rental cycle — inventory and availability, bookings, check-out and return, deposits, damage, late fees, invoicing and maintenance — for any rentable asset, from cameras and tools to vehicles and event equipment.
It is multi-tenant: one installation serves many rental businesses, each with its own inventory, staff, customers and settings. You operate the platform; they operate their businesses.
This guide covers installation and first-run setup only. For day-to-day use of the admin panel — every screen and what it does — see the User Manual included in the same download.
You do not need to be a developer. The installer is a five-step wizard in your browser. If you can upload files and create a MySQL database in cPanel, you can complete this guide.
What is in the download
The file you downloaded from CodeCanyon unzips to this:
rentiqo/
├── source-code/
│   └── source-code.zip    The application, ready to upload.
├── documentation/         This guide.
├── user-manual/           How to use the admin panel, screen by screen.
├── demo/                  Demo site address and login details.
└── readme.txt             What each folder is, and where to get help.
The only file you upload is source-code.zip, found inside the source-code/ folder. It is already zipped for you — upload it as it is and extract it on the server.
Do not upload the whole download. The documentation, user manual and demo folders are for you, not for your server. Putting them online publishes files that serve no purpose in production.
Server requirements
Almost every shared host sold in the last few years meets these. The installer checks all of it for you on step 2 and tells you exactly what is missing, so you do not have to verify this list by hand.
Core
| Requirement | Minimum | Notes |
|---|---|---|
| PHP | 8.2 | 8.3 recommended |
| MySQL | 5.7 | MariaDB 10.3+ also works |
| Web server | Apache / Nginx / LiteSpeed | mod_rewrite enabled on Apache |
| Disk | ~250 MB | Plus space for uploaded photos |
PHP extensions
All fifteen are required. Most are enabled by default:
| Extension | Extension | Extension | Extension |
|---|---|---|---|
| BCMath | Ctype | cURL | DOM |
| Fileinfo | JSON | Mbstring | OpenSSL |
| PDO | PDO MySQL | Session | Tokenizer |
| XML | GD | Zip | — |
Writable folders
These must be writable by the web server. On cPanel, set permissions to 755; if the installer still reports them as unwritable, use 775.
storage/
storage/framework/
storage/logs/
bootstrap/cache/
public/uploads/
.env
PHP settings. If your host allows changes, these make life easier — particularly if you plan to upload item photographs in bulk.
memory_limit = 256M · max_execution_time = 120 · upload_max_filesize = 32M · post_max_size = 32M
Upload the files
Open the source-code/ folder from your download. Inside it is a single file — source-code.zip. That one file is the entire application, and it is the only thing that goes onto your server.
Choose where it goes
Main domain (example.com) — upload into public_html/.
Subdomain (app.example.com) — create the subdomain first, then upload into the folder it created.
Subfolder (example.com/rentals) — upload into public_html/rentals/.
Upload source-code.zip and extract it
In cPanel File Manager, open the folder you chose above, click Upload, and select source-code.zip. When it finishes, select the file and click Extract.
It ships as a zip on purpose. Uploading thousands of loose files over FTP is slow and quietly drops a few along the way — and a single missing vendor/ file produces errors that look nothing like the real cause, which is a miserable way to spend an afternoon.
Check the structure, then delete the zip
After extracting you should see app/, public/, vendor/, artisan and the rest sitting directly in your chosen folder — not nested inside another folder.
If everything landed one level too deep, move the contents up. Then delete source-code.zip from the server: it is no longer needed and leaving a copy of your whole application downloadable is not something you want.
Point your domain at public/. Everything above public/ — including .env, which holds your database password — must not be reachable from a browser.
On cPanel, set the domain's Document Root to public_html/public. If your host does not allow that, the included .htaccess in the root will forward requests correctly, but changing the document root is safer and faster.
Create a database
Rentiqo needs an empty MySQL database and a user with full access to it. Create both before running the installer.
Open MySQL Databases in cPanel
Create a new database — for example rentiqo. cPanel will prefix it with your account name, giving something like myaccount_rentiqo. That full name is what the installer needs.
Create a database user
Use a strong password and save it somewhere. You will paste it into the installer in a moment and are unlikely to be shown it again.
Add the user to the database
Grant ALL PRIVILEGES. This is the step people forget, and the installer will report it as a connection failure rather than a permissions one, because from the outside those look identical.
Write these four things down: database name, database user, password, and host. The host is almost always localhost — a small number of hosts use a separate database server address instead, which they will have told you.
Run the installer
Open your domain in a browser. Rentiqo detects that it has not been installed and takes you to the wizard automatically.
https://yourdomain.com/install
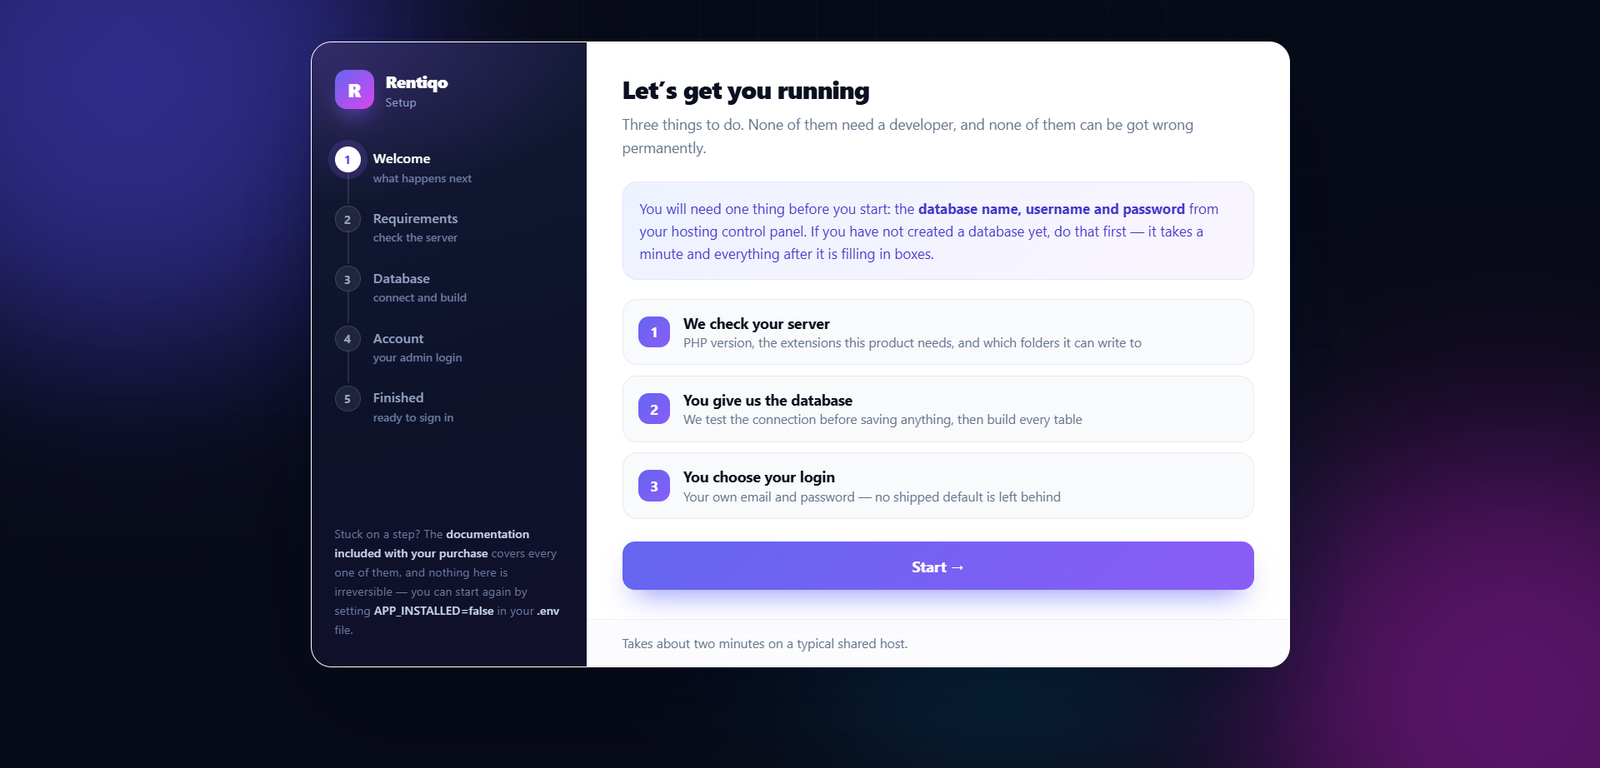
Welcome
Confirms what the wizard is about to do. Click Get Started.
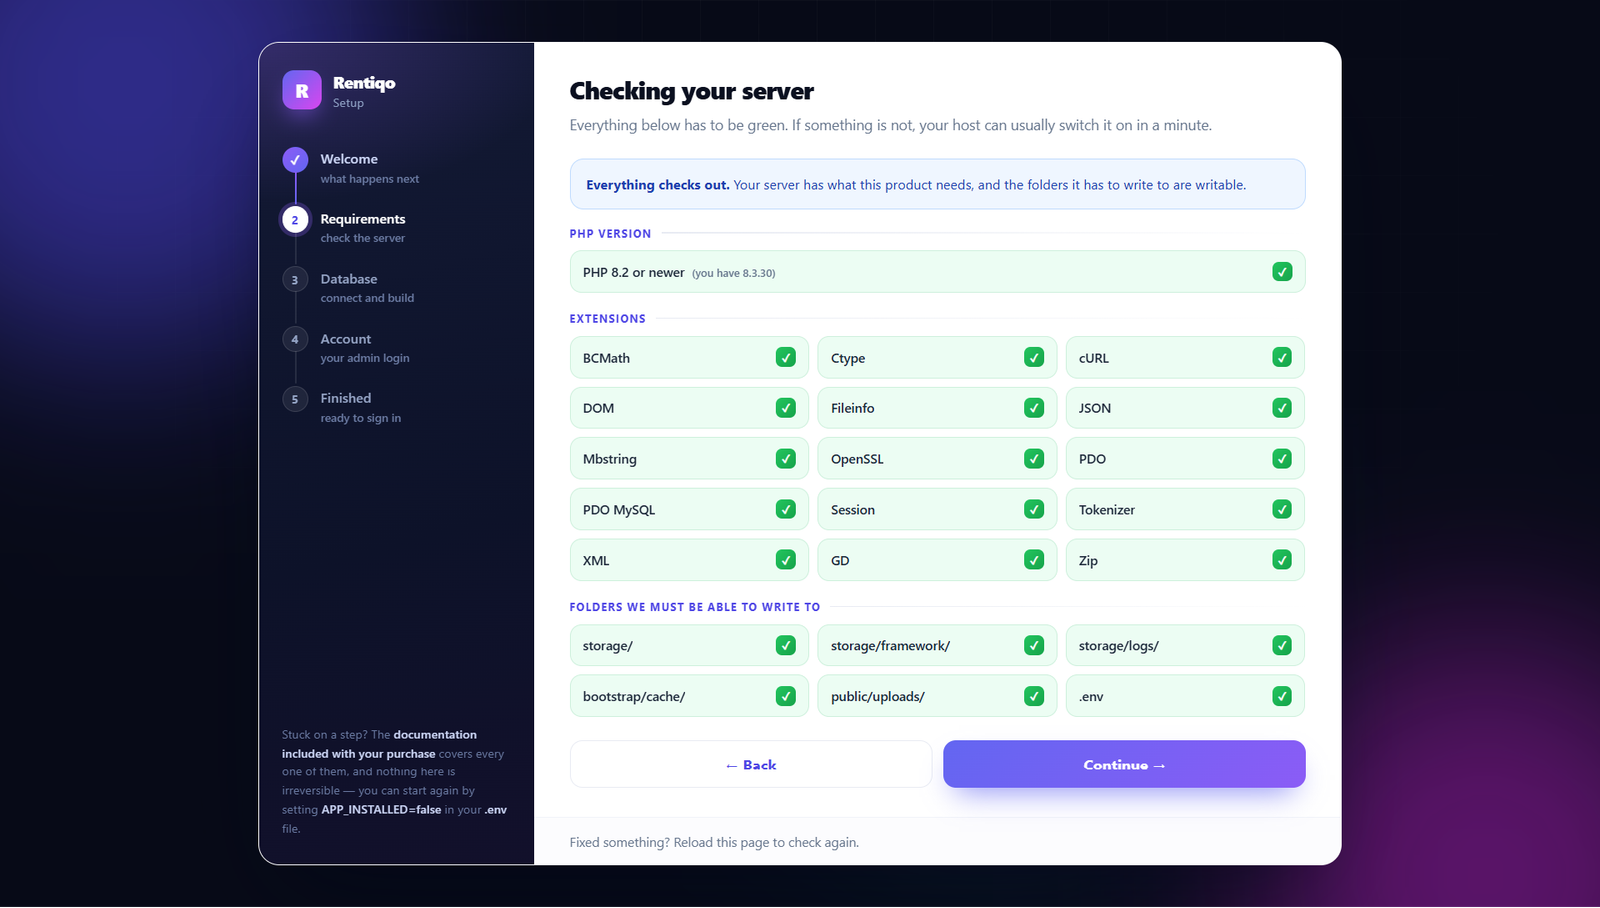
Server requirements
Every PHP version, extension and folder permission is checked and shown with a tick or a cross. Continue only becomes available when everything passes.
If something fails, fix it and reload this page — you do not need to restart the wizard. Permission failures are the most common; see Troubleshooting.
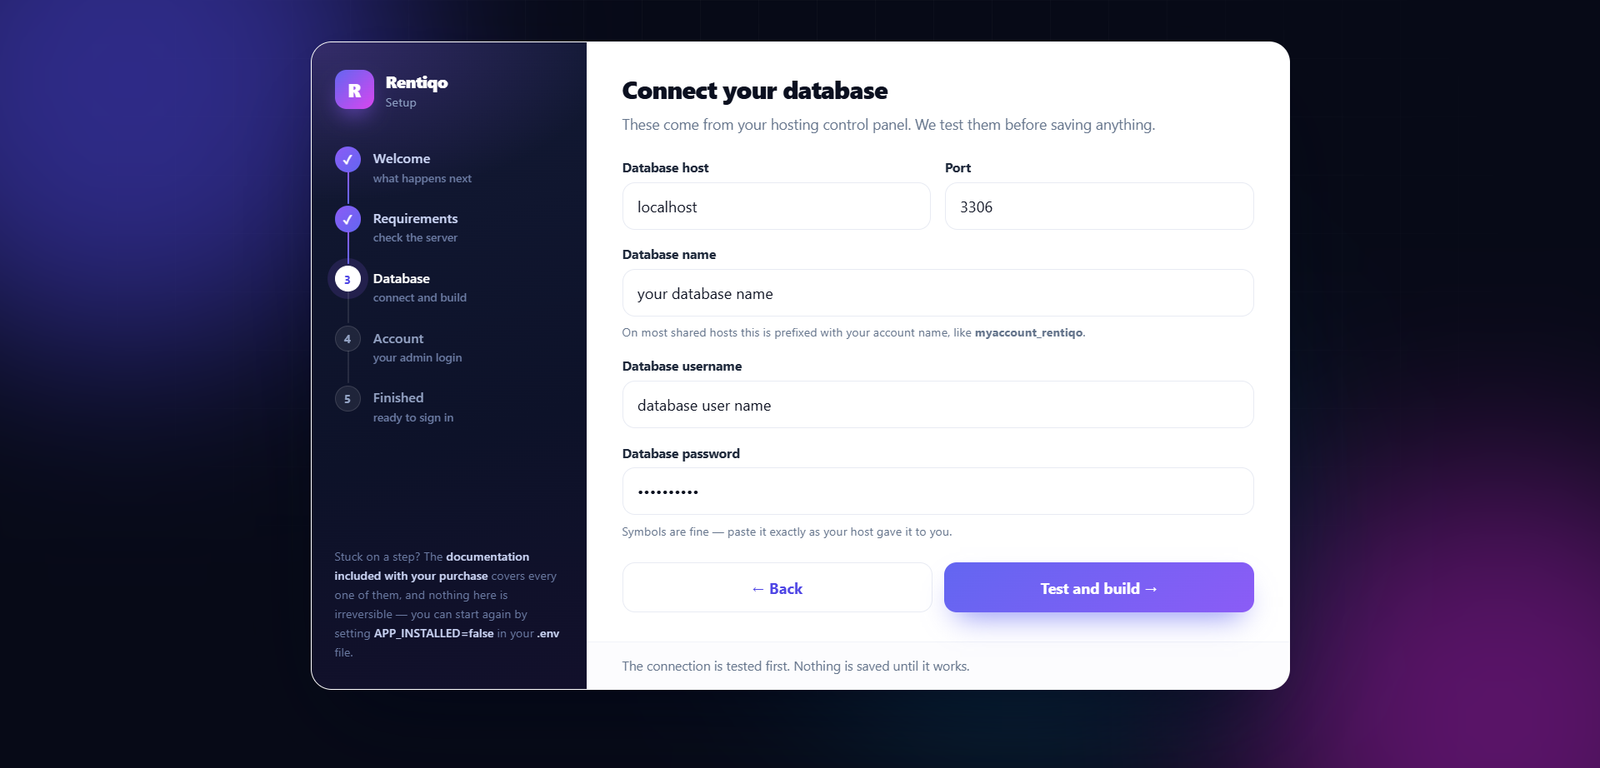
Database
Enter the four details from step 2. The installer tests the connection before writing anything, so a mistake here costs you nothing but a retry.
When the connection succeeds it creates all tables and installs the default currencies, languages, email templates and landing page content. On a shared host this takes anywhere from a few seconds to a minute — do not close the tab.
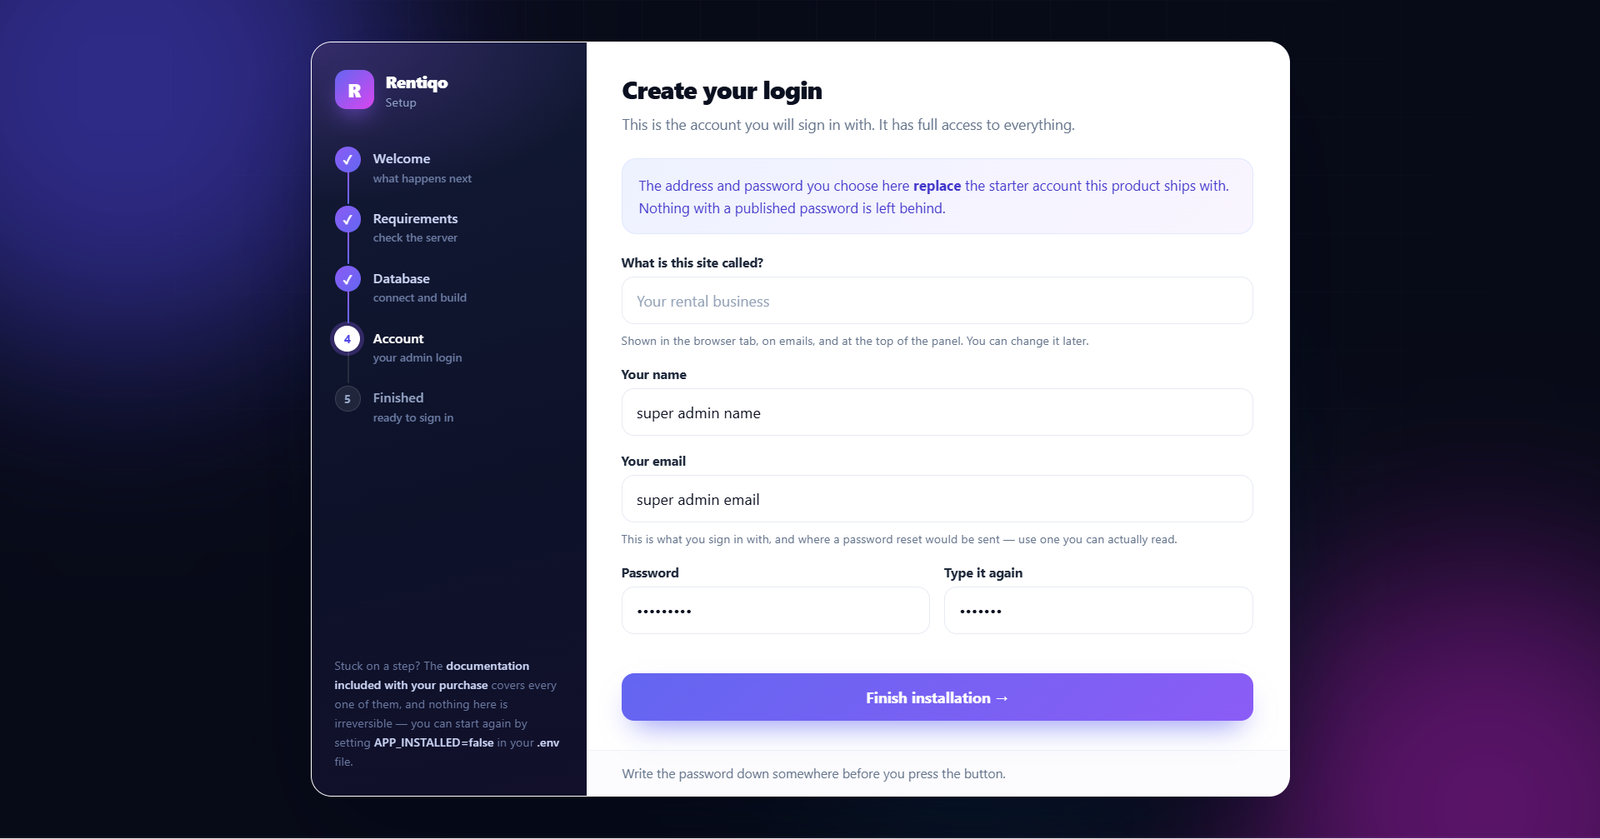
Admin account
Create the account you will use to run the platform. Use a real email address you can receive mail at — password resets go there, and it is the address the system uses when something needs your attention.
Finish
Installation is complete. The installer locks itself so it cannot be run a second time, which also means nobody can reach that URL later and reinstall over your data.
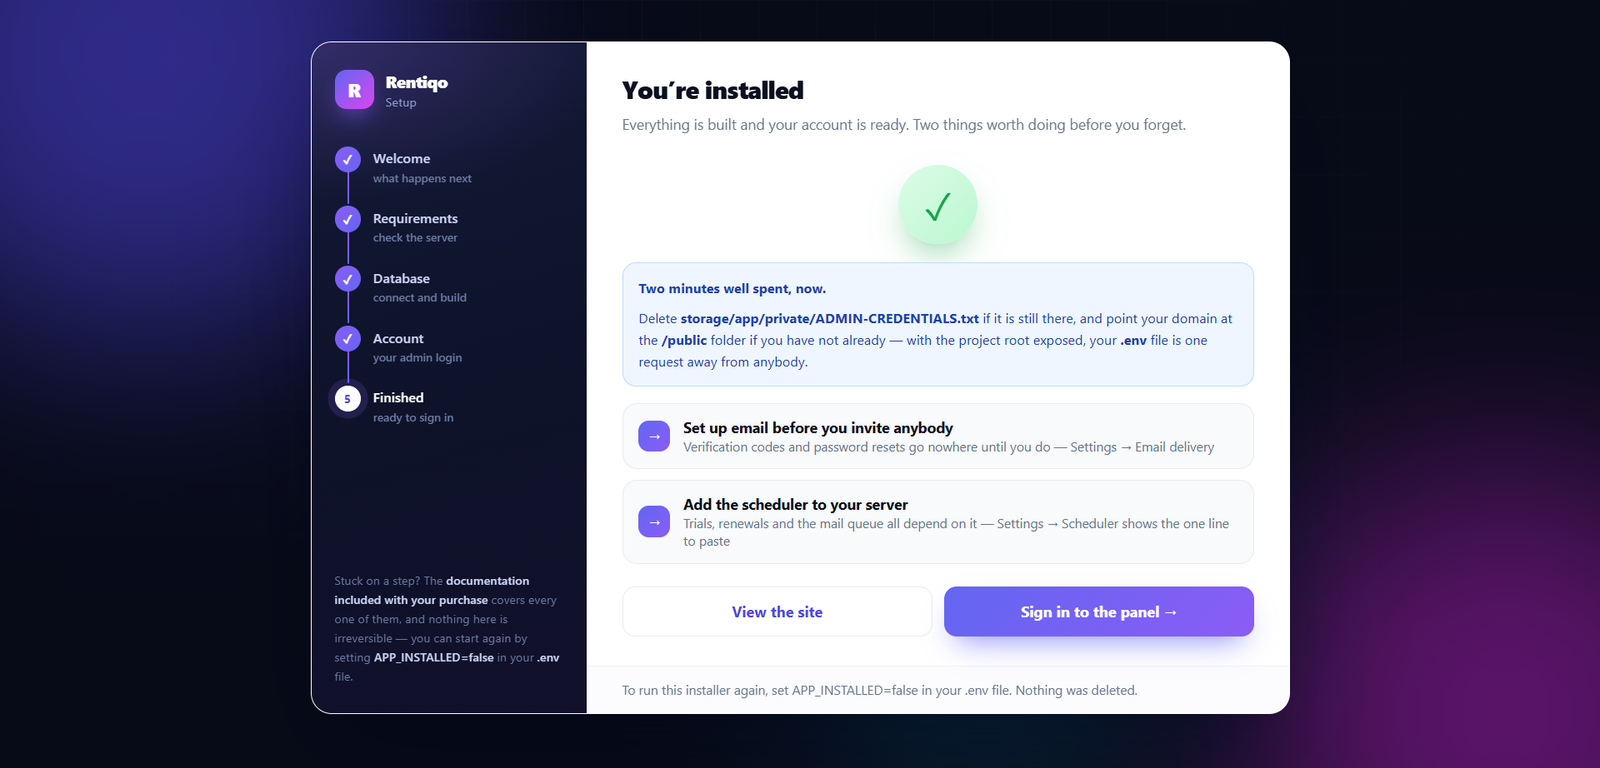
You can now sign in at https://yourdomain.com/admin/login with the account you just created.
Do not stop here. The next section is not optional. Without the scheduler, overdue rentals are never flagged, subscription renewals never process, and reminder emails never send — and none of it produces an error, so it can go unnoticed for weeks.
Set up the scheduler
Rentiqo runs background work on a schedule: detecting overdue returns, raising preventive maintenance when it falls due, processing subscription renewals, sending reminders and clearing expired invitations. All of it runs from a single cron entry.
Add the cron job
In cPanel, open Cron Jobs, choose Once Per Minute, and paste this command — replacing the path with your own installation path:
* * * * * cd /home/username/public_html && php artisan schedule:run >> /dev/null 2>&1
The exact command for your server is shown inside the admin panel, with the correct path already filled in. Copy it from there rather than editing the line above.
Check that it is working
The Scheduler screen shows when the scheduler last ran. Every workspace also shows a small indicator in the bottom status bar:
- Green dot — ran within the last two hours. Everything is fine.
- Amber dot — has not run recently, or has never run. Your cron entry is not working.
If it stays amber for more than a few minutes after adding the cron job, use the Run now button on the Scheduler screen to confirm the tasks themselves work, then check the path in your cron command.
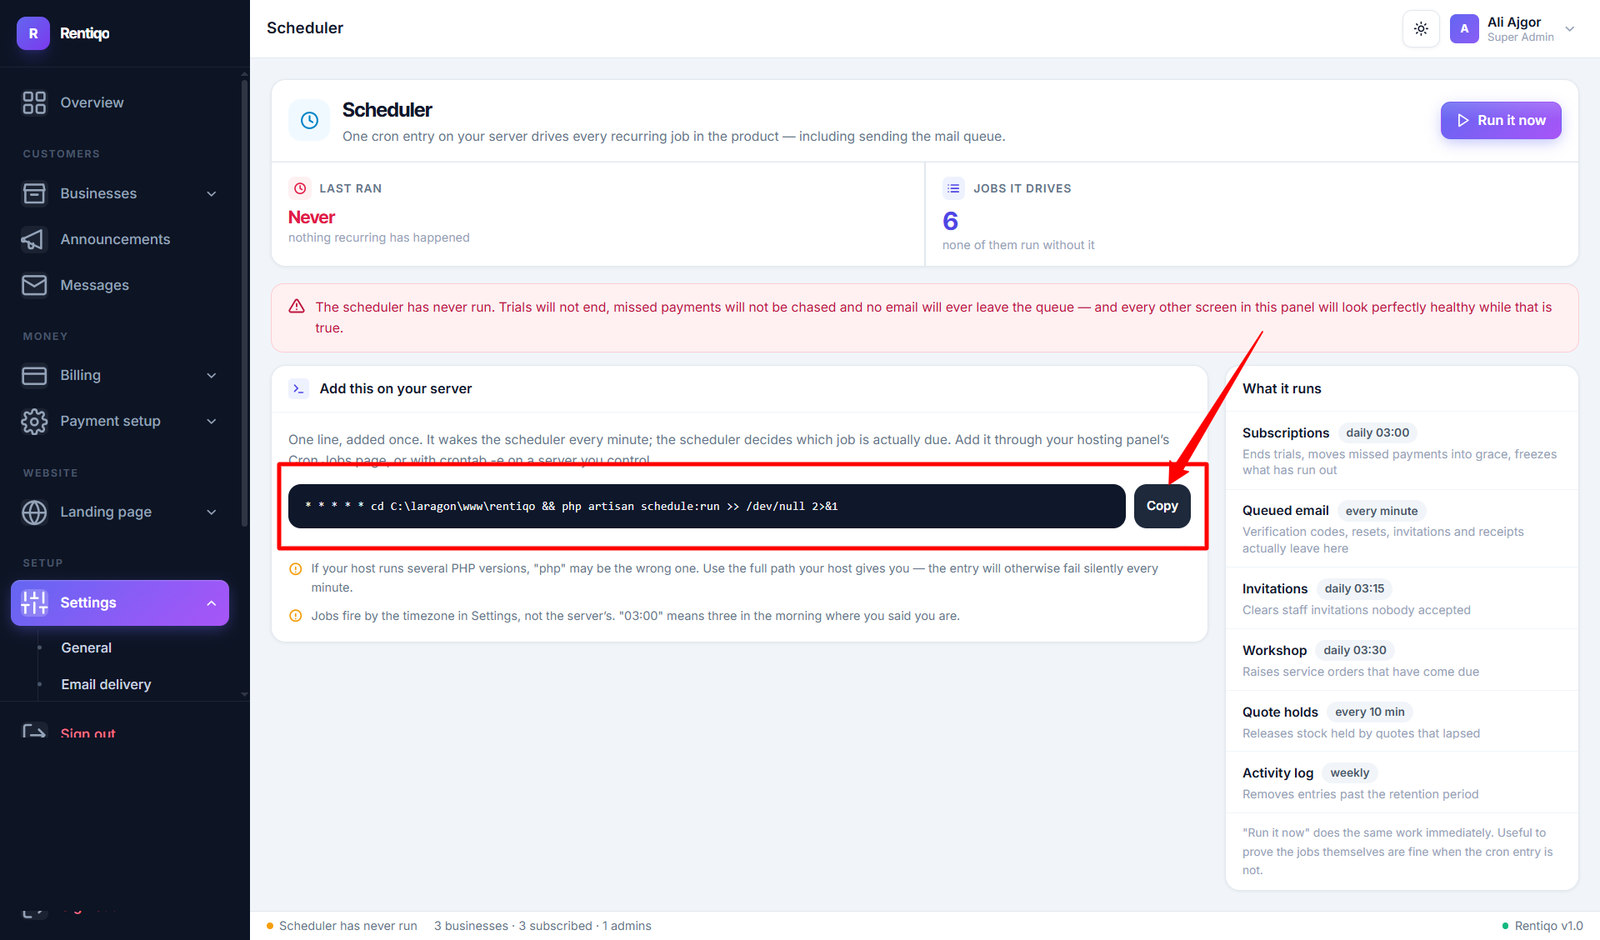
Some hosts use a different PHP binary for cron than for the web. If the schedule never runs but Run now works, replace php in the cron line with the full path — commonly /usr/local/bin/php or /opt/alt/php83/usr/bin/php. Your host's support can tell you which.
First login
Sign in at /admin/login. The order below is the order things actually need doing — email first, because almost everything else depends on it.
Set your site identity
Set your site name, logo, favicon, timezone and default currency. The site name appears throughout the application and across the whole landing page — the marketing copy uses a token that renders your name everywhere, so changing it here rebrands the public site in one move.
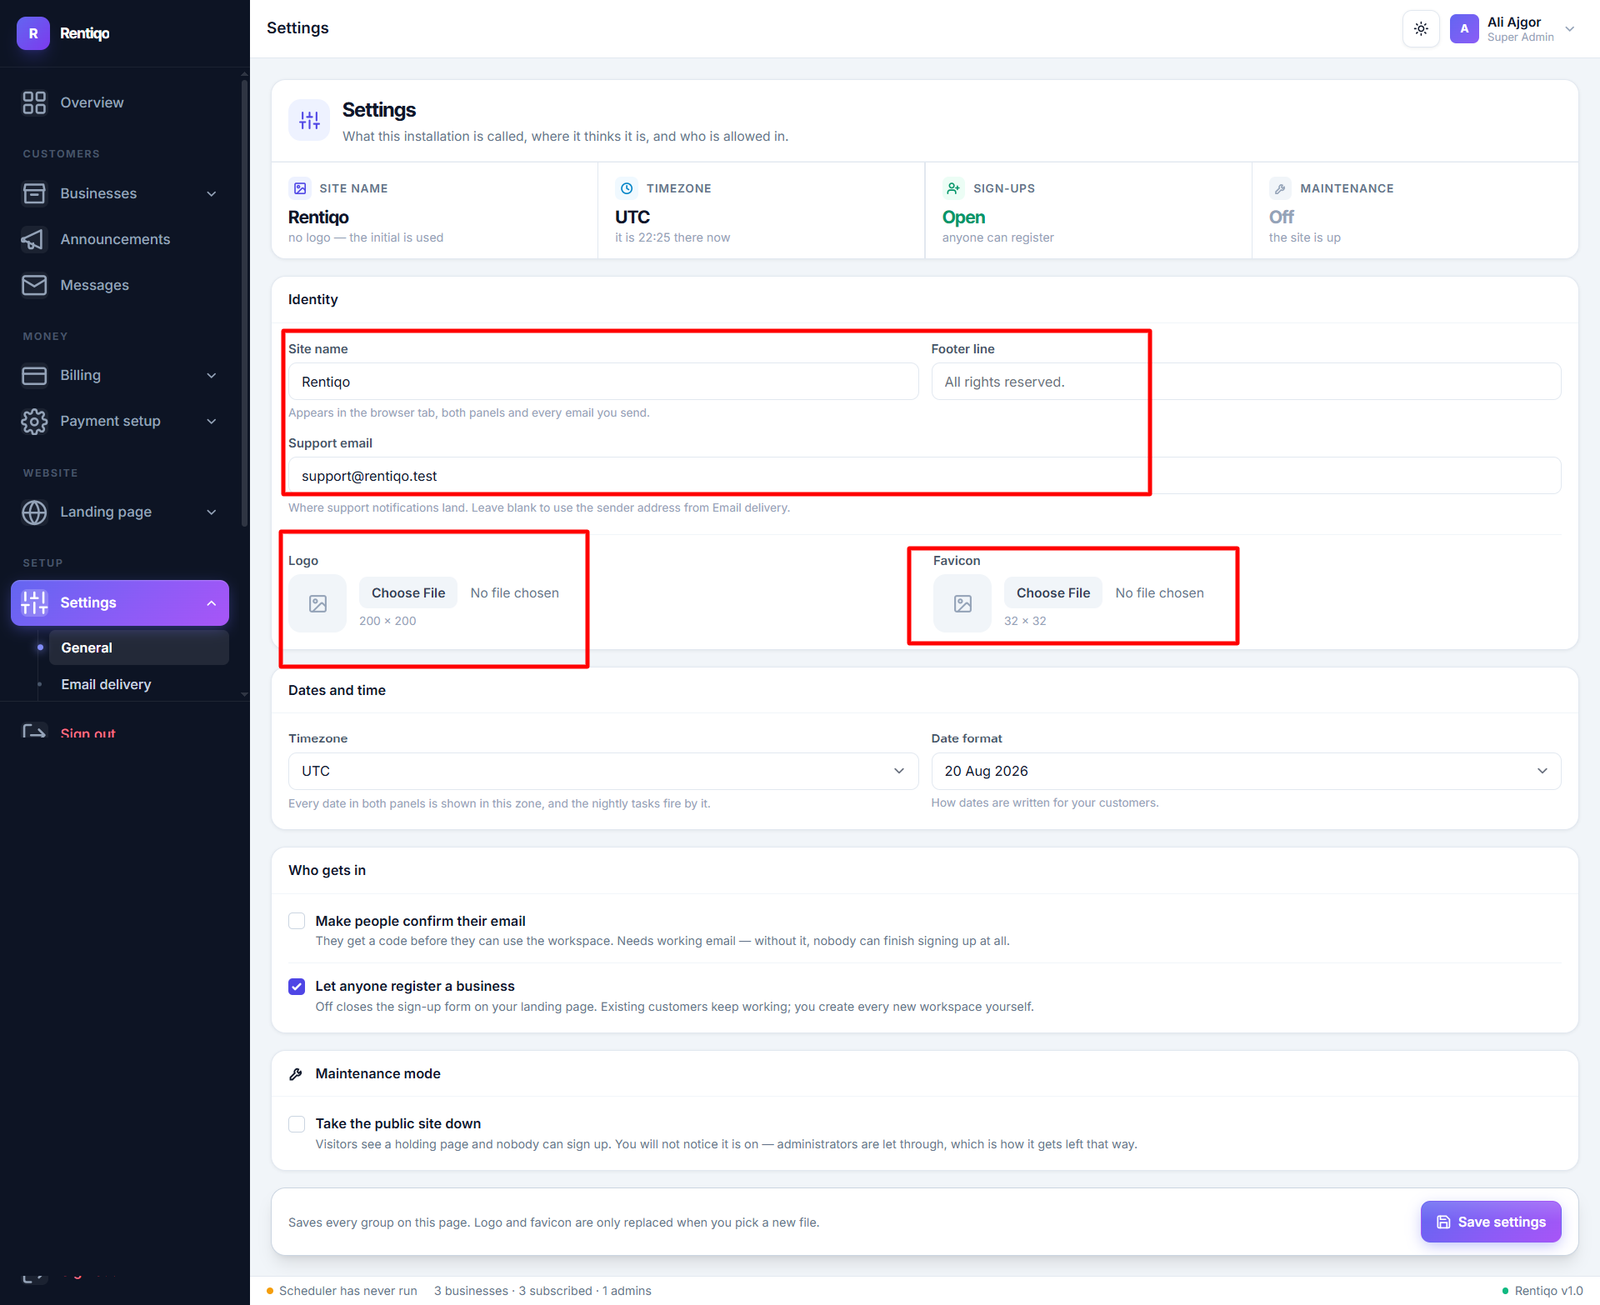
Set the timezone before taking any bookings. Rental periods, late fees and overdue detection are all calculated against it. Changing it later does not retroactively move bookings that were already recorded.
Email delivery
This is the most important thing to configure after installing. Without working email, nobody can register, nobody can reset a password, and no customer receives a booking confirmation or a reminder.
Enter your SMTP details
Use the details from your email provider. A typical configuration:
| Field | Typical value | Notes |
|---|---|---|
| Mailer | smtp | |
| Host | smtp.yourprovider.com | From your provider |
| Port | 587 | 465 if using SSL |
| Encryption | TLS | SSL for port 465 |
| Username | Your SMTP username | Often the full email address |
| Password | Your SMTP password | See the note below |
| From address | noreply@yourdomain.com | Must be a domain you own |
| From name | Your site name | What recipients see |
Send a test email
The screen has a test button. Use it before moving on — an SMTP setting that is nearly right fails silently, and the first person to discover it is usually a customer who cannot reset their password.
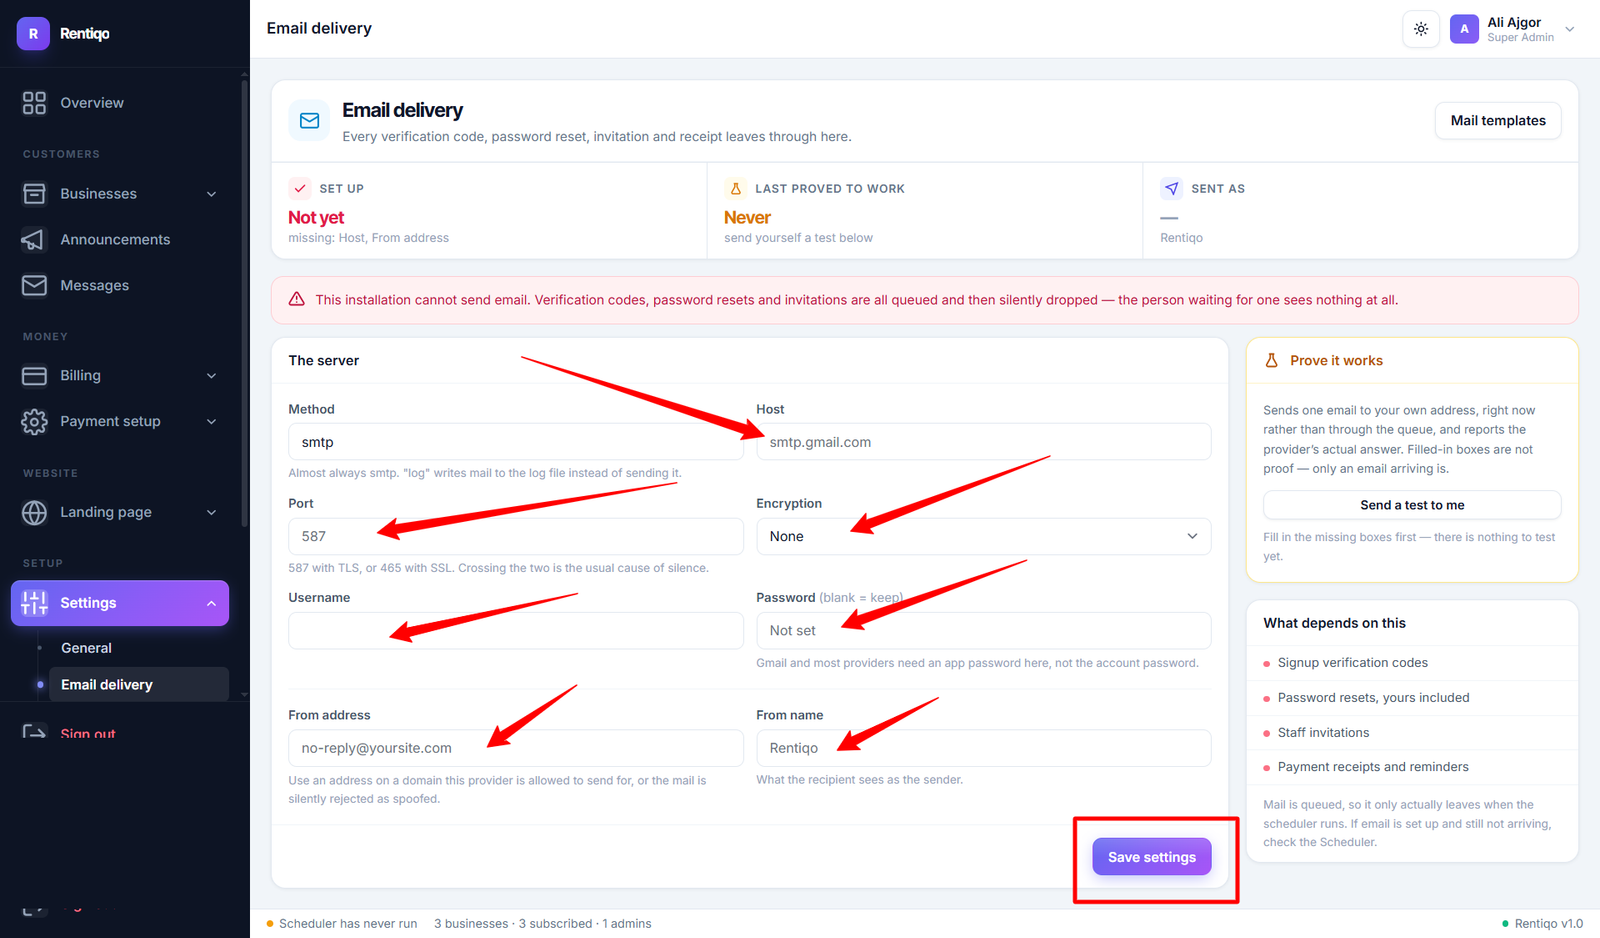
Gmail and Outlook need an app password, not your normal one. Both refuse plain account passwords from third-party applications. Generate an app-specific password in your account's security settings and use that instead.
Use a real mail service for anything serious. Shared hosting mail servers are frequently on spam blocklists, which means your mail is accepted and then silently discarded on the way. A dedicated sender — Amazon SES, Mailgun, Postmark, Brevo — costs little or nothing at low volume and dramatically improves whether your email actually arrives.
Review the email templates
Every message the system sends is editable here — welcome emails, password resets, booking confirmations, invoices, reminders. The defaults are complete and sensible, so you can leave them alone at first. Worth a read when you have time, so you know what your customers receive.
Payment gateways
Configure at least one gateway so businesses can subscribe to your plans.
Nine gateways are supported. Enable the ones that fit your market and leave the rest switched off:
| Gateway | Gateway | Gateway |
|---|---|---|
| Stripe | PayPal | Razorpay |
| Paystack | Flutterwave | Mollie |
| SSLCommerz | UddoktaPay | Xendit |
For each gateway you enable
- Paste the API keys from your gateway dashboard
- Start in test / sandbox mode and complete one payment end to end
- Copy the webhook URL shown on the screen into your gateway's dashboard
- Switch to live mode only once a test payment has worked
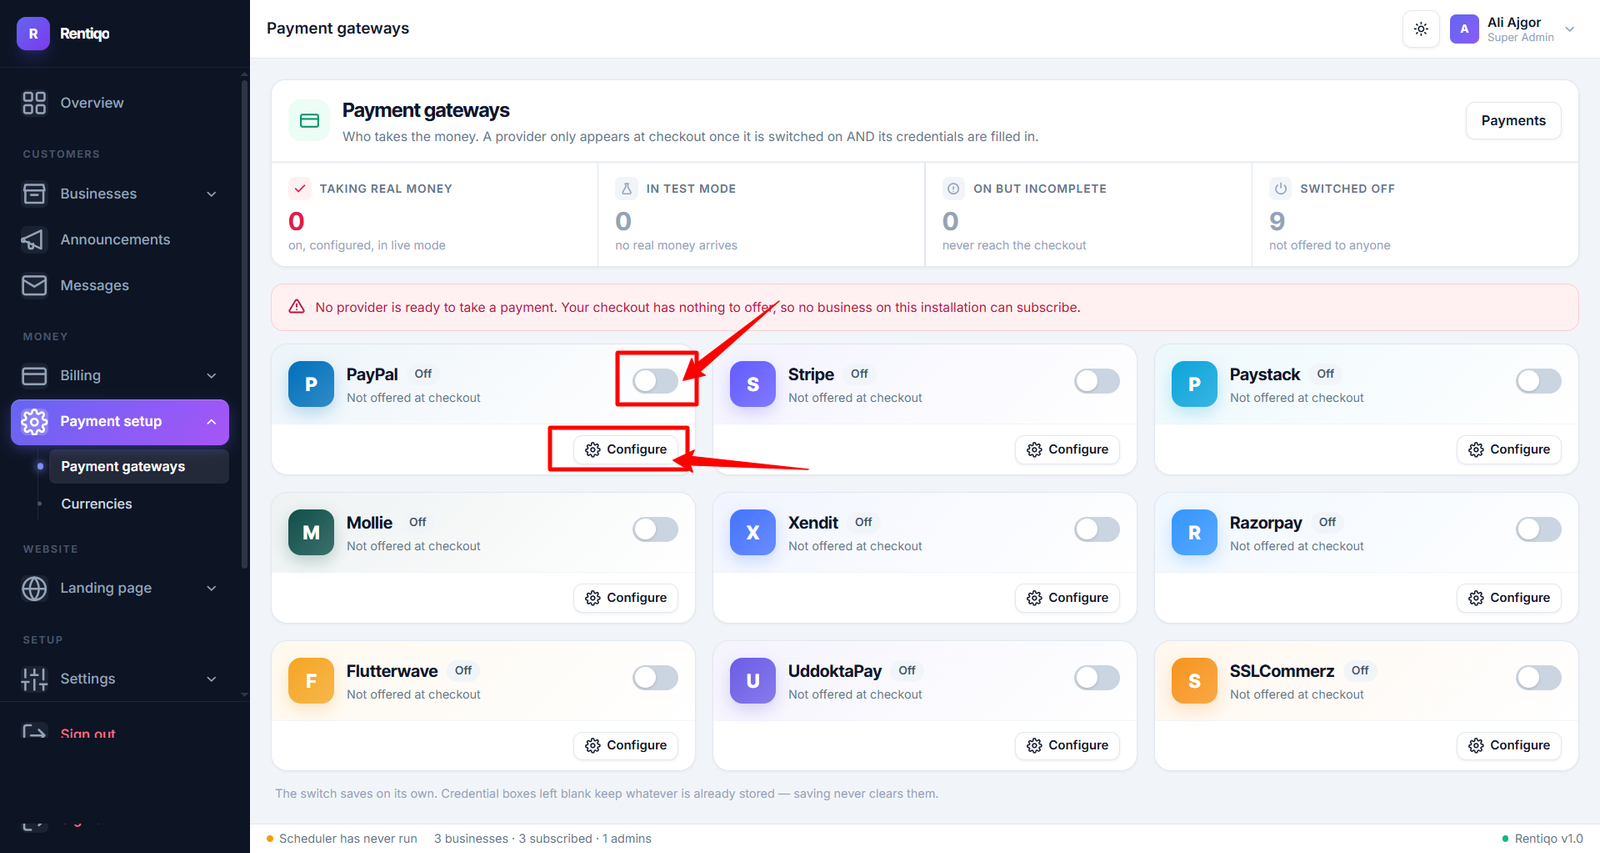
The webhook matters more than it looks. The browser returning from a payment page proves nothing — a customer can close the tab, and some gateways confirm slowly. The webhook is how the platform learns a payment truly succeeded. A gateway configured without it will appear to work and will then miss payments that complete a moment later.
Currencies
A full list is installed for you. Set the one you sell subscriptions in as the default, and enable any others you need. Each currency carries its own symbol, decimal places and formatting.
Settle on your default currency before you take a single payment. Historic records keep the currency they were created in. Changing the default afterwards leaves you with a database of mixed currencies and totals that no longer mean anything.
Subscription plans
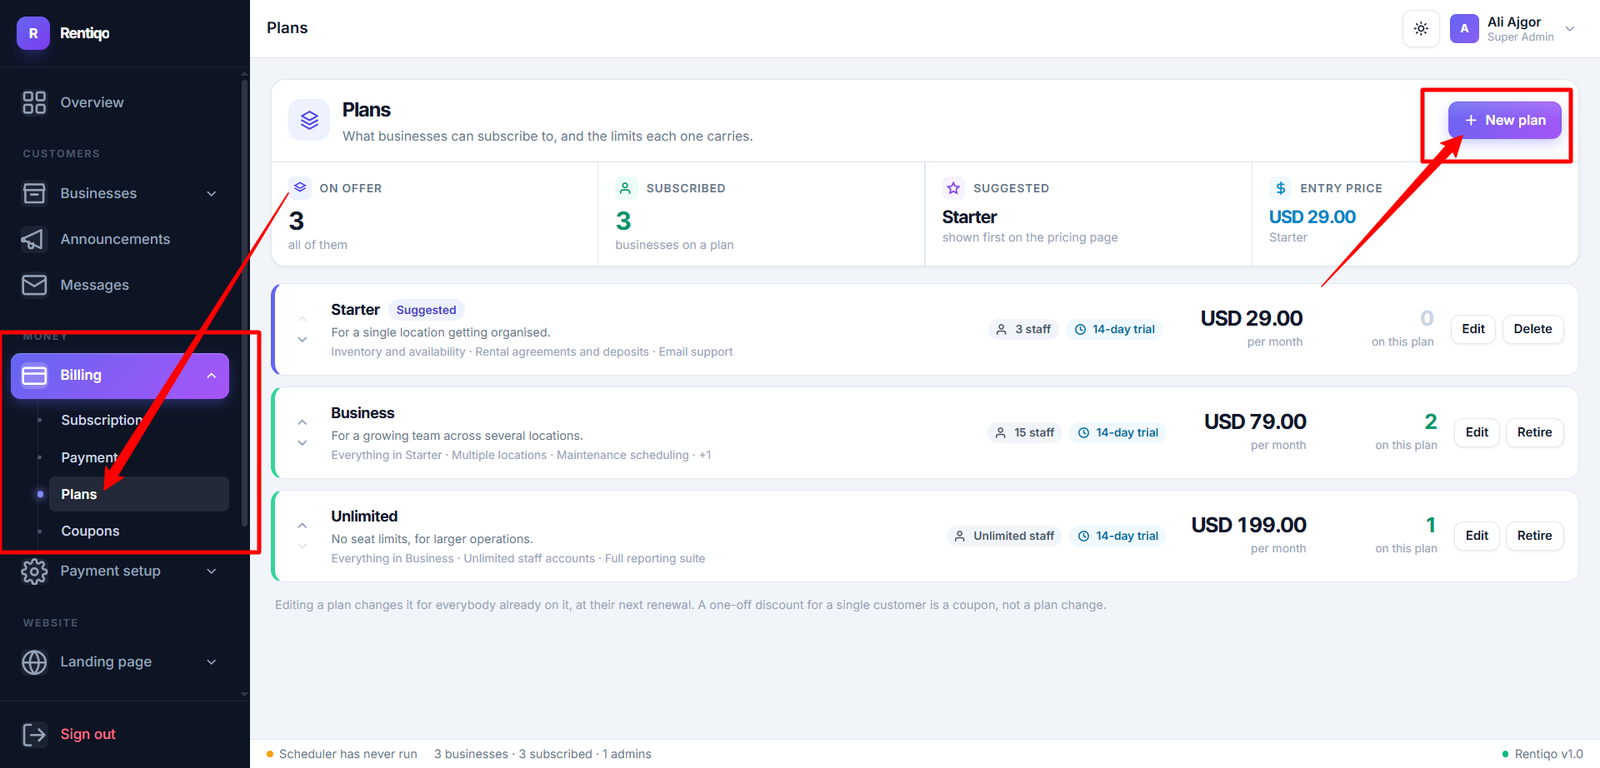
Plans are what rental businesses subscribe to on your platform. Sample plans are installed so the pricing section of your landing page is not empty — edit them into your own offering rather than starting from nothing.
For each plan you set the price and billing period, a trial length if you want one, and the limits that apply — how many items, units, staff members and locations the plan allows.
Whatever you set here appears on the landing page automatically. The public pricing section reads your real plans, so there is no second place to keep updated when you change a price.
Landing page & SEO
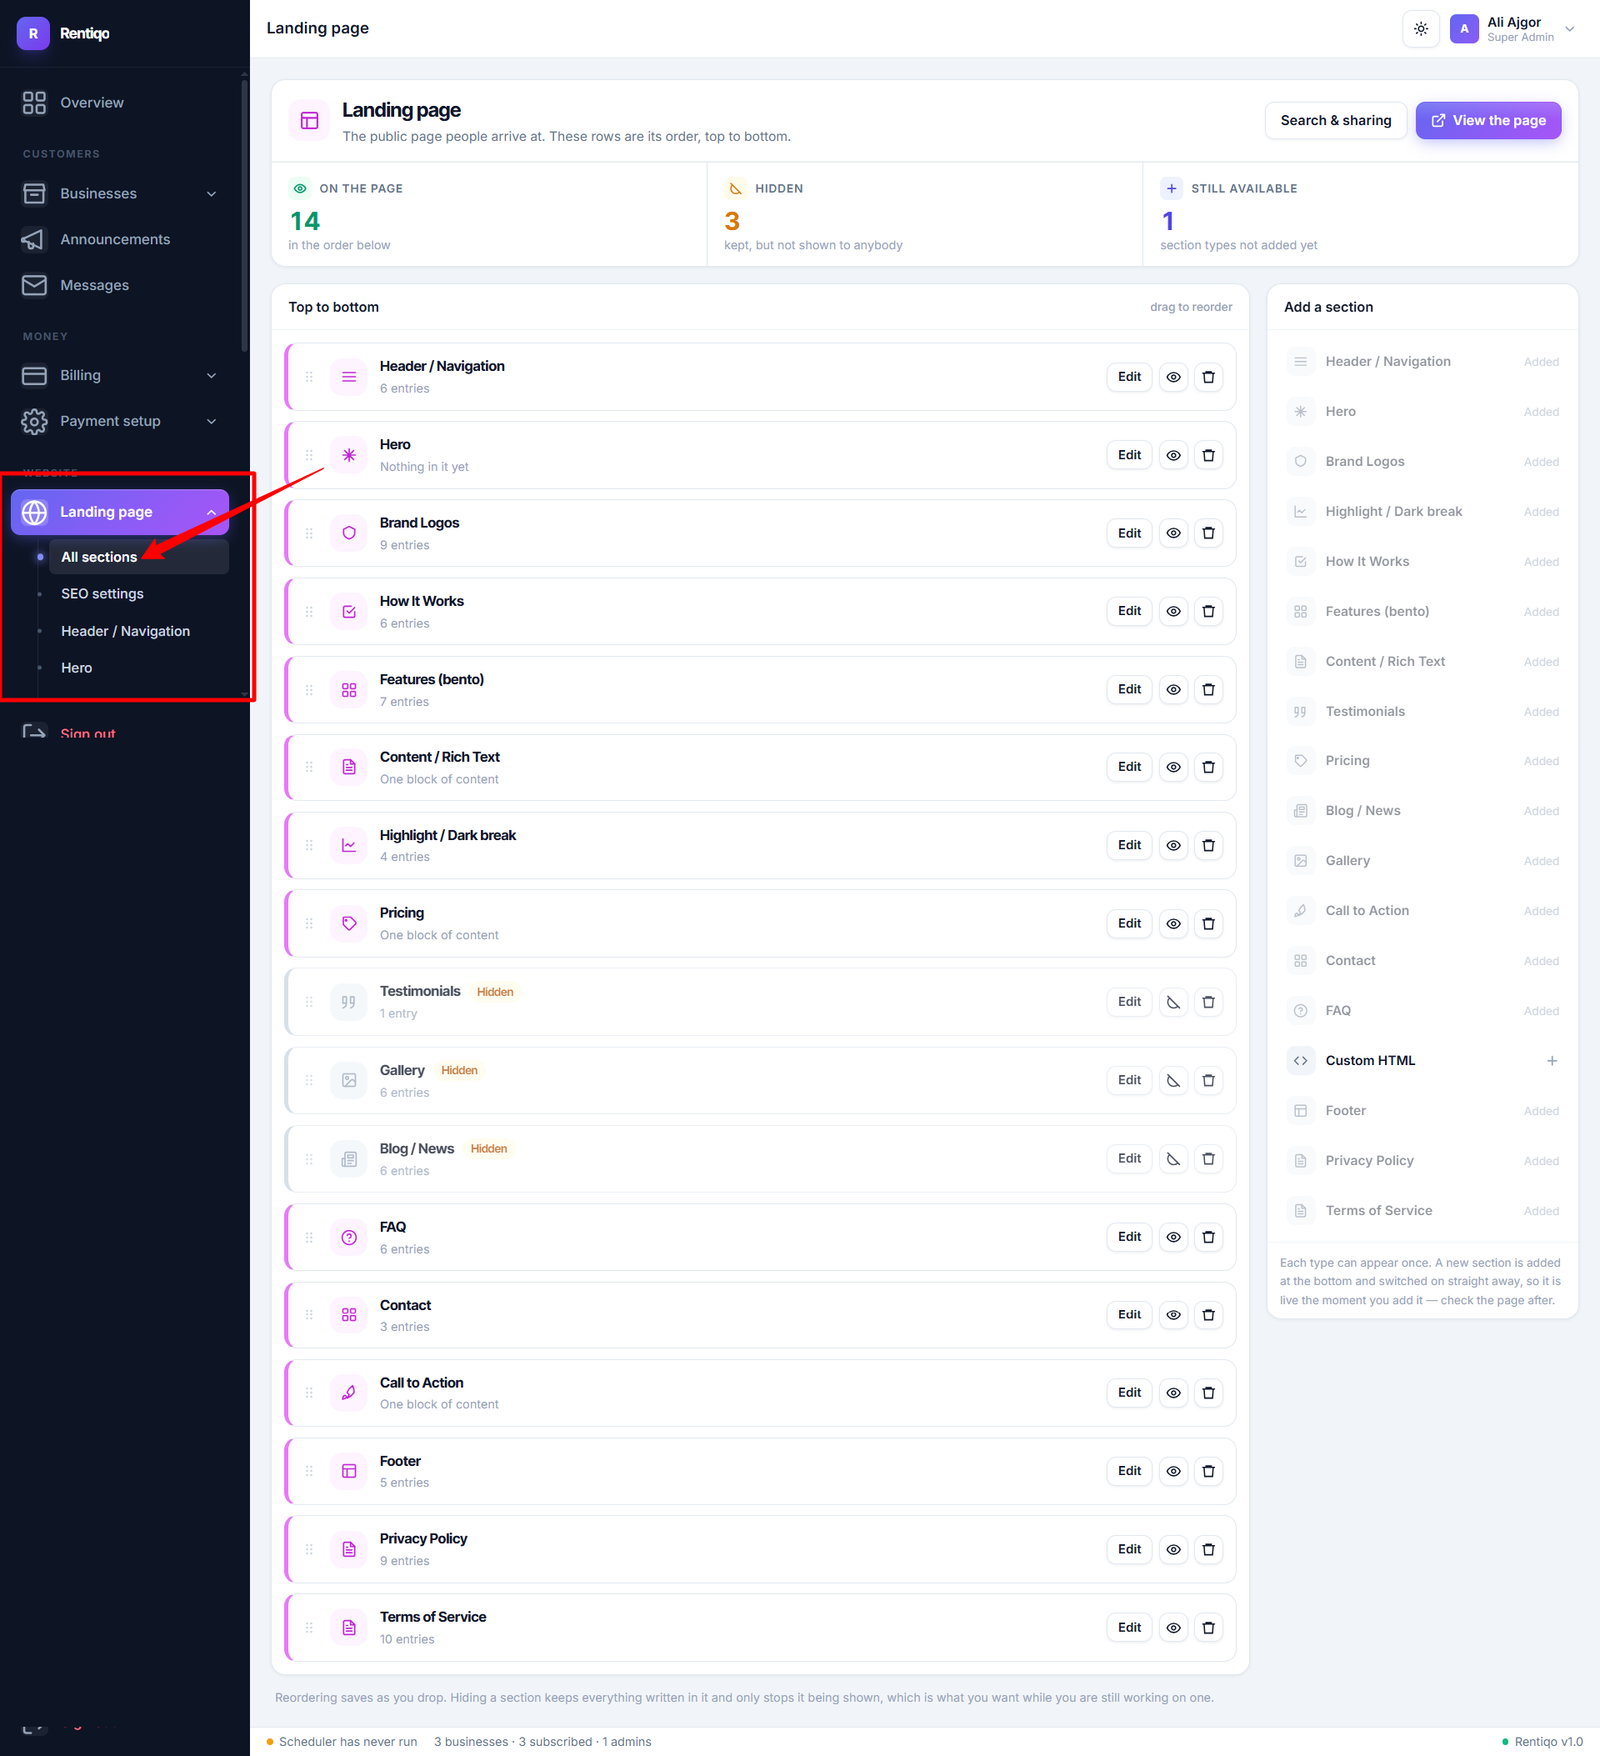
Your public marketing page ships complete — hero, features, pricing, FAQ, contact form and more. Every section can be edited, reordered, or switched off entirely.
What to change first
- Contact — replace the placeholder email address and phone number
- Hero — your own headline and screenshot, if you have one
- Testimonials — switched off by default; turn it on once you have a real review
- Footer — your links and copyright line
Messages from the contact form arrive in the admin panel, under Messages, with an unread count on the sidebar. Nothing is emailed unless you have configured email delivery.
SEO
Meta title and description, social sharing image, keywords, and the sitemap. The page title and description follow your site name automatically, so this is mostly about the sharing image and keywords.
Languages
English is installed and active. You can add more languages, translate any text in the application from within the admin panel, and set which language new visitors see by default.
Right-to-left languages such as Arabic, Hebrew, Urdu and Farsi are fully supported — mark the language as RTL and the whole interface mirrors, including the admin panel and the landing page.
Skip this if you only need English. It changes nothing else and can be done at any point later.
Go-live checklist
Before you send anyone to your site:
- The scheduler shows a green dot — cron is running
- A test email arrived successfully
- At least one payment gateway completed a real end-to-end payment in live mode
- Gateway webhook URLs are saved in each gateway's own dashboard
- Default currency and timezone are set and will not change
- Plans reflect what you actually sell
- The landing page contact details are yours, not the placeholders
- HTTPS is active and the site loads over
https:// - Your admin password is strong and stored somewhere safe
- You have taken one backup and confirmed it downloads
Test the restore, not just the backup. A backup nobody has ever restored is an assumption, not a safety net. Take one now, while there is nothing to lose, and confirm it works.
Updating
When a new version is released, download the updated package from your CodeCanyon downloads page.
Back up first
Both the database and your public/uploads/ folder. Every update, without exception.
Replace the application files
Upload the new source-code/ contents over your installation. Keep your existing .env file — it holds your database credentials and application key. Overwriting it disconnects the site from its own data.
Run the migrations
Open the update URL in your browser, which applies any database changes the new version needs:
https://yourdomain.com/install/update
Clear the caches
From the admin panel, or over SSH if you have it:
php artisan optimize:clear
Read the changelog before updating. If a release notes a breaking change, it will say so and explain what to do. Updating across several versions at once is fine, but read all the entries in between.
Troubleshooting
The questions that come up most often, and what actually causes them.
The installer says a folder is not writable
Set the folder to 755 in cPanel File Manager, with Recurse into subdirectories ticked. If it still fails, try 775.
Some hosts run PHP as a different user than the one that owns your files, and no permission setting fixes that from your side — your host's support can correct the ownership in seconds.
"500 Server Error" straight after installing
Nearly always one of three things:
- Wrong document root. The domain must point at
public/, not the folder above it. storage/not writable. Laravel cannot write its own cache and fails before it can tell you why.- PHP version too low. Check that the domain itself is on PHP 8.2+, not just the server default — cPanel sets this per domain.
The real error is in storage/logs/laravel.log. The last entry names the actual problem.
Emails are not being delivered
Use the test button on Settings › Email delivery first — it reports the specific failure.
- Authentication failed — Gmail and Outlook need an app password, not your account password.
- Connection timed out — your host blocks outbound SMTP. Ask them to open port 587, or use an API-based provider.
- Sends but never arrives — check spam, then your SPF and DKIM records. Shared hosting mail is frequently blocklisted.
The scheduler indicator stays amber
Press Run now on Settings › Scheduler. If that turns it green, the tasks are fine and only your cron entry is wrong — check the path, and try the full path to the PHP binary instead of bare php.
If Run now also fails, check storage/logs/laravel.log for the underlying error.
A payment succeeded but the subscription is still inactive
The webhook is almost certainly not configured. The platform confirms payments server-to-server, not from the customer's browser, so without the webhook it never learns the payment completed.
Copy the webhook URL from Payment setup › Payment gateways into your gateway's dashboard, then check Money › Payments — the payment will be recorded as pending rather than missing.
Uploaded images do not appear
public/uploads/ must exist and be writable. If it was created after installation, set it to 755 and try again.
If uploads fail only for larger files, raise upload_max_filesize and post_max_size in your PHP settings — they must both be larger than the file.
I forgot my admin password
Use Forgot password on the admin login page — but this needs working email, which is why email delivery is the first thing to configure.
If email is not yet working, you can reset the password directly in the admins table using phpMyAdmin. The password column stores a bcrypt hash, so paste a hash rather than plain text; any bcrypt generator will produce one.
The page looks unstyled or broken
Usually a stale cache after moving domains or changing the URL. Clear the caches from the admin panel, or run php artisan optimize:clear.
If it only happens on some pages, check that APP_URL in .env matches the address you are actually visiting, including https://.
Can I move the installation to another domain?
Yes. Copy the files and the database, update APP_URL and the database details in .env, then clear the caches. Update your gateway webhook URLs to the new address as well — they point at the old domain until you change them.
How do I take a backup?
The admin panel includes backup and restore. You can also do it manually: export the database from phpMyAdmin and download public/uploads/. Both are needed — the database alone does not contain your photographs.
Changelog
Version 1.0.0
Initial release.
- Multi-tenant rental management — inventory, availability, bookings, check-out and return
- Deposits, damage charges, late fees, meter readings and overage
- Invoicing with PDF output
- Preventive maintenance and workshop job board
- Ten reports including asset utilisation, ROI and deposit liability
- Subscription billing with nine payment gateways
- Editable landing page with contact form
- Multi-language and RTL support
- Backup and restore, activity log, role-based permissions
Support
If this guide has not solved your problem, get in touch. Support is available to verified buyers.
Please have your Envato purchase code ready. Support is provided to verified buyers only, and we may ask you to supply your purchase code before we can help.
You can find it on your CodeCanyon Downloads page — click the download button beside this item and choose Licence certificate & purchase code.
What to include
Support is far faster when the first message contains enough to diagnose the problem:
- Your Rentiqo version
- PHP and MySQL versions
- Your hosting type — shared, VPS, cPanel, Plesk
- What you did and what happened instead
- The last entries from
storage/logs/laravel.log - A screenshot of the error, if there is one on screen
- Your Envato purchase code
Support covers the product — bugs, installation problems and questions about how features work. It does not cover server administration, customisation, or third-party integrations, though we will always point you in the right direction where we can.
Thank you for choosing Rentiqo. If it has been useful, a rating on your CodeCanyon downloads page genuinely helps.